 Customer Hub
Managed Device
The Managed Device enrollment type is suitable, for example, for organizations or schools to hand out devices to users. Administrators have full access to the devices and can, for instance, view the list of installed apps and reset the devices to factory settings. A factory reset is necessary for commissioning. Relution does not automatically prevent additional accounts, such as a private Google ID, from being added. The Disable adding and removing accounts option in the Restrictions → configuration is available for this purpose. As a rule, this enrollment type is used for company-owned devices that are provided to employees or students to be used exclusively for professional or school activities (no private use).
Creating an Enrollment in Relution
- Under
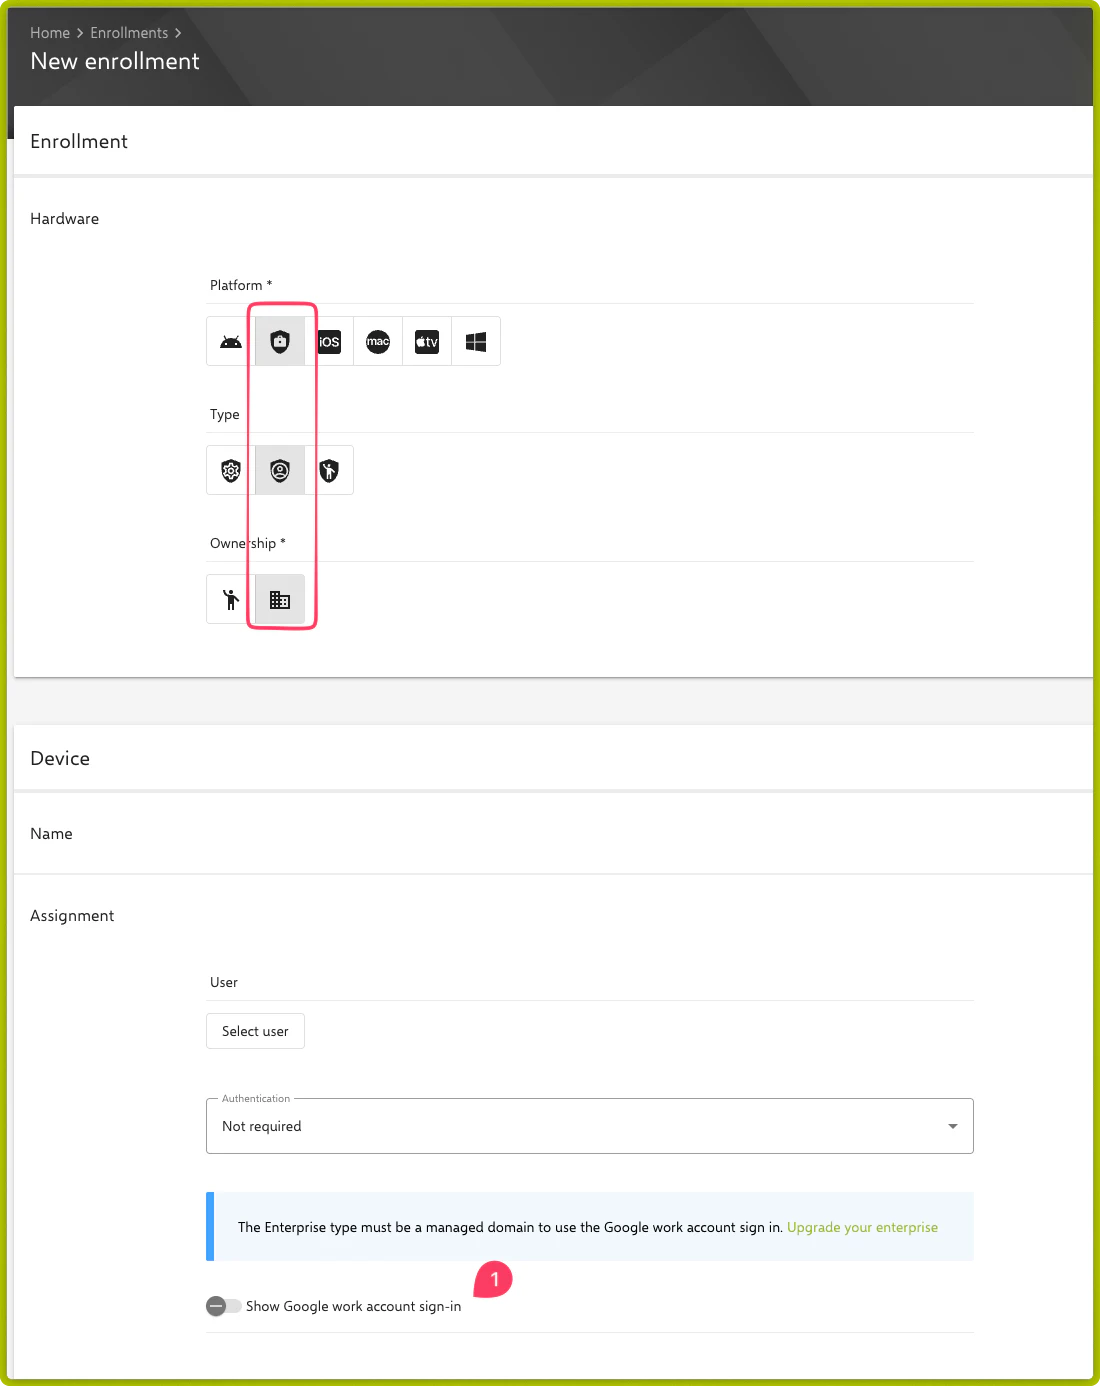
Devices→Enrollments, Add is clicked. - Android Enterprise is selected as the platform and, under Type, the Managed device icon (the name appears as a tooltip; preselected by default).
- The ownership would be COD (Company Owned Device) in this case.
- A device name is assigned and the enrollment is saved.
Ownership is a mandatory field and is applied to the device during enrollment. Together with the settings under Settings → Device Management → Enrollment, it determines which device actions are allowed (Wipe device, Lock device, Locate device, Reset lock passcode) and whether the ownership can still be changed after enrollment. With COD, all of these actions are allowed by default, and the ownership can be changed afterwards.
Google Work-Account-Setup
During enrollment, the option Show Google work account sign-in is available. When enabled, the device is still set up using the enrollment QR code. After scanning, the user signs in with their Google work account (Google Workspace). If Using Android’s built-in app (enforces multi-use) is additionally selected under Authentication, Relution signs the user in automatically based on the email address of the Google account. Starting with Relution 26.5.5, this requires exactly one user of the organization the enrollment belongs to with this email address, and this user must be neither locked nor deactivated; otherwise, the Relution login page is displayed. This assigns the device to a named Relution user, see Enrollment options →. Enrollments with this option can always be used for multiple devices and do not expire.
For details on the Work Account policy configuration, see Work Account Setup →.
Prerequisite: managed domain
Android Enterprise distinguishes between two enterprise types:
| Enterprise type | Setup | Google Work-Account-Setup |
|---|---|---|
| Managed Google Play Accounts | Default – registered with any Google account. Users automatically receive a managed Google account during enrollment. | Not available |
| Managed domain | Requires an active Google Workspace license with a verified company domain. Users sign in with their existing @company.com account. | Available |
If the Relution organization was initially linked using a personal Google account (Managed Google Play Accounts), the form shows the following notice for the Managed device type above the Show Google work account sign-in switch:
“The enterprise type must be a managed domain to use the Google Work Account sign in.”
Upgrade enterprise
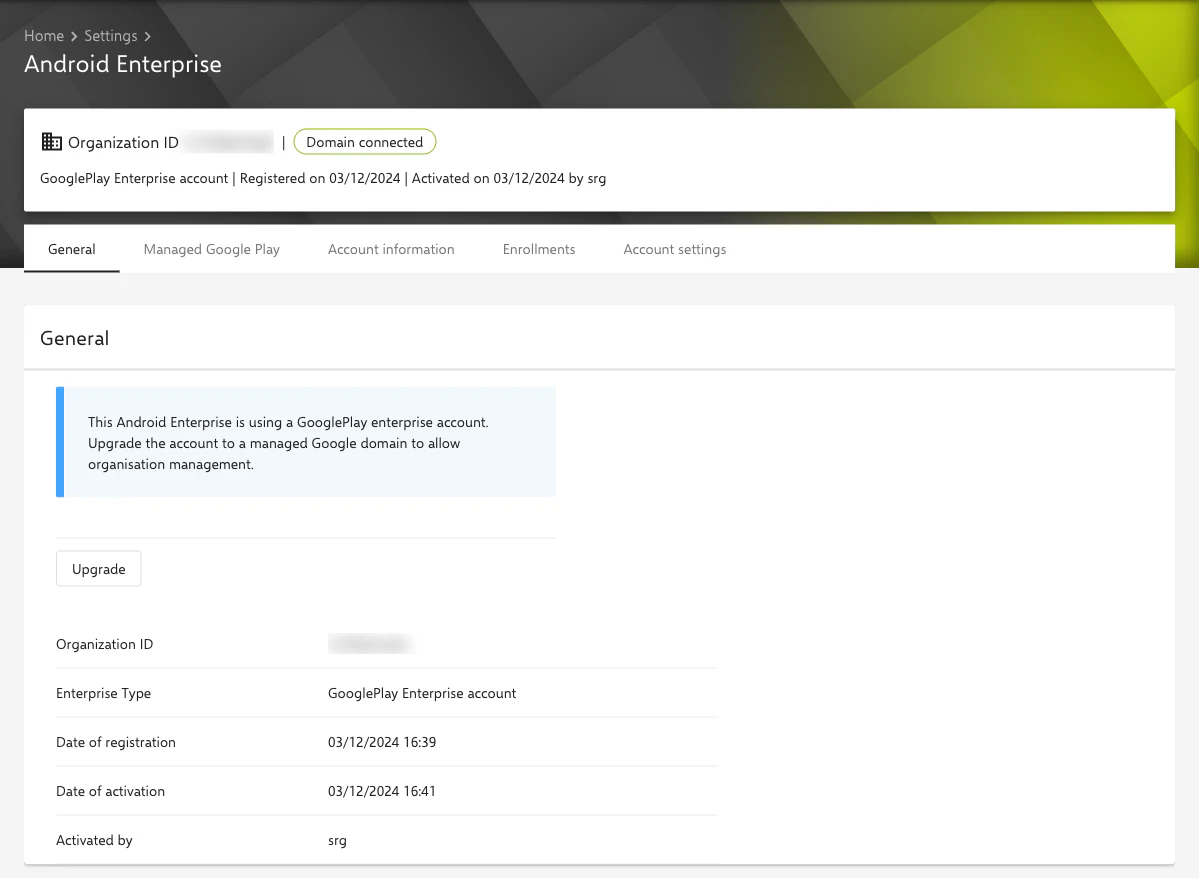
The Upgrade your enterprise link opens the Settings → Android Enterprise page. There, the Upgrade button on the General tab launches a Google-provided wizard in a new browser tab that links the existing Android Enterprise to the organization’s Google Workspace. The link is only shown to users with read access to the Android Enterprise settings; all other users see a notice to contact an administrator for the upgrade instead. The following prerequisites must be met:
- An active Google Workspace license (Business, Enterprise, Education, etc.)
- Administrator access to the Google Workspace Admin Console
- A company domain verified in Google Workspace
After a successful upgrade, the Show Google work account sign-in option becomes available in the enrollment. In addition, user authentication must be enabled for the connected enterprise in the Google Admin Dashboard (admin.google.com). If it is not enabled, the enrollment form shows the following notice:
“The connected Enterprise Account needs to enable User Authentication. This can only be done in the Admin Dashboard at admin.google.com.”
Once both prerequisites are met, users can enroll using their existing @company.com accounts.
Necessary Information for Performing the Enrollment
In the created enrollment, a QR code is displayed under Enrollment information, which can be used to enroll Android devices. This can also be accessed via the QR Code column in the Enrollments overview. Alternatively, the device can be enrolled via the Using DPC identifier tab, see Enroll devices without camera →.
Resetting Android Devices
To start the enrollment for Managed Device, Android devices must first be reset to factory settings.
Welcome Screen on the Devices
A spot on the welcome screen is tapped 6 times quickly.
Scanning the Relution QR Code
The devices will then display a prompt to scan the QR code from the created enrollment.
Completing the Enrollment
The further instructions are followed to set up the devices. After successful enrollment, administrators have full access to the managed devices.
Actions
- Install app from the Google Play Store
- Remove app
- Install app from the Relution Store
- Clear app data (Android 9 and later)
- Send file to device
- Remove eSIM
- Add eSIM
- Reset device to factory state
- Shutdown device
- Restart device
- Locate device →
- Fully lock device
- Update device information
- Enable lost mode (Android 11 and later)
- Disable lost mode
- Send message
- Reset password
Policy Configuration
The available configurations include the following:
- Work Account Setup →
- Manage apps →
- Advanced keyguard feature management →
- Advanced security overrides →
- Device password →
- Global proxy →
- Kiosk Mode →
- Runtime permission management →
- Play Store Management →
- Restrictions →
- Samsung Classroom Management →
- Location mode →
- System updates →
- Wi-Fi →
All configurations are described in the Overview → article.